Showing posts with label diy. Show all posts

Saturday, December 21, 2013

The best WORST Christmas sweater


My sister had an "ugly christmas sweater' competition at her job. She didn't have any ideas and came to me. I had the perfect idea, thanks to Pinterest of course. The only downside was she waited until the night before the office party and wasn't interested in doing this project with me. But it's no big deal. I love being crafty and this was a fun little project. I stayed up all night to get it as close as I could. It was a little bit of a fail but it turned out pretty decent. As decent as a hideous sweater can be.

Needless to say she WE won first place.


Wednesday, November 27, 2013

Fitted Crib Sheet Tutorial


Happy Wednesday! So Thanksgiving is tomorrow, can you believe it?! 
I will be spending some much needed time with my family and I probably won't be back until the weekend. So I will leave you with my latest DIY+Tutorial! This is intended for a crib mattress/toddler bed but I am using mine to put at the bottom of a playpen so I'm using a soft block of foam instead. This project took me about 45 minutes to an hour (keep in mind I was stopping periodically to snap pictures). And it was a breeze the whole way through. So give it a try! Happy Thanksgiving everybody!!


YOU WILL NEED:
2 yards of your choice of fabric (I recommend anything soft)
Mattress or foam (I used a soft foam block measuring 22" x 36" and 4" deep)
 At least 2 yards of elastic (1" wide or smaller. I chose 3/8")
 Scissors, matching thread, measuring tape or ruler, safety pins and stick pins.


Cut out a rectangle that is 8-10" larger than your mattress on all sides. 
Fold into fourths (fold it in half and half again.) For this step it doesn't matter which side is facing where, just so long as you have one corner where all the edges are left open.


IF YOUR FABRIC IS 8" LARGER: Cut out an 8x8 square out of the open corners.
IF YOUR FABRIC IS 9" LARGER: Cut out a 9x9 square out of the open corners.
And so on...


 Take the two sides of each corner, right sides together, and sew.
This is gonna be the corners of the sheet. Repeat for all four corners. You can serge the seams, zigzag 'em or leave it raw like I did.
Again, you can serge or zigzag around the entire sheet before moving on to the next step, but I chose not to... Mainly because I don't have a serger and it's just one extra step that I don't find necessary.


Now for the pinning, you can go ahead and iron it down right before pinning the edges down. I folded mine over about an inch that way the channel is 1/2" wide which is perfect for my elastic which is 3/8" wide. If you've already ironed it down really well then you don't have to actually pin it all the way around. But I hate ironing soooo I just pinned it lol. 
Make sure to pin a start and stop point so that you leave an opening. I usually leave about an inch for this. You don't need a gaping hole, just enough to get the elastic in 'n out.  
To insert the elastic take one end (let's call it side A), attach a safety pin, and pin the opposite end (side B) to the sheet. Side B will act as an anchor. Start stringing side A through the channel, all the way around till it comes out the other side. When you finally get to the end go ahead and take the safety pins out and overlap the ends of elastic about an inch and sew them together using a zigzag stitch. Go back and forth a few times to ensure that they won't come apart. Tuck it back into the casing and sew the opening closed.


 That's it! You're done!


 photo signature_zpsbd922b58.png

Monday, September 2, 2013

Floral headpiece tutorial

 1: Take some fake flowers of your choice ( I used my moms flower arrangement shhhh!). They don't have to be all the same flower but mine are. Also, it doesn't really matter how many, the more flowers you choose the wider and fuller it will be. I chose about 7 medium sized flowers. Snip off and discard all of the wires, stems and plastic backings so you're just left with the actual flowers.

2: Take some embroidery floss (or an old flexible headband) in any color of your choice. I chose brown because it matches my hair. Measure the desired length of your headpiece. For a full headband measure all the way around your head, for half measure half-way around your head, and so on. Mine isn't quite half way around my head, more like 3/4 of the way or about 7 inches long. Cut 9 stands of the desired length and set aside.

3: Whip out your glue-gun and heat it up!


 4: Take the 9 strands of floss, tie a knot in one end, separate into sections of 3 and braid it up tight. Once you reach the other end tie another knot. Take your flowers that you've chosen and arrange to your liking. 

5: Once arranged and your glue gun is ready to go carefully take each flower one by one and glue to your headpiece. 

6: Allow a few minutes to pass as the glue cools off and solidifies. 

(not pictured)
7: There are a few different ways to attach clips or pins. You can take 2 bobby pins or hair clips of your choice and glue them to both ends... Or if you're lazy like me you can leave it as is, do you hair however you want and simply tuck the ends of the headpiece into your hair and simply secure the ends with a bobby pin on each end.


Voila! Enjoy :)


 photo signature_zpsbd922b58.png

Saturday, August 17, 2013

Baby scratch mittens - TUTORIAL

My sister called me up about a week ago and asked me to make some mittens for her. At first I was confused, it's still summer (sort of) and when the baby gets here she won't need mittens for at LEAST 4 more months. But she told me that babies scratch their faces a lot while they sleep. So mommies put mittens on them to protect them from that. the more you know... Many baby items turn out to be really expensive when they really don't have to be. So we hopped over to the fabric store and got 4 colors of thin soft fleece. About 1/4 of a yard each. There's quite a lot of fleece still left over when I was done so you'll be seeing more of this soon ;)


You will need:
1/4 yd. fleece or any baby soft fabric
10" elastic or opt for elastic thread
scissors
matching thread
matching ribbon


 1. Cut out four gumdrop shapes (or pac-man ghosts) 3 1/2" long and 4 1/2" tall tapering ever so slightly towards the top. You can also cut this on the fold, that way you're only cutting out two.
2. Right sides together, sew up 3/4 of one side. This is so it lays flat the entire time. It's easier that way.

3.  Woops! I had to change colors because I forgot I was making a tutorial and just finished the yellow ones without photos lol. Anyway, open up the lil gumdrops, you can press the side seam open here if you'd like. I didn't because it wasn't necessary.  
4.  Fold the bottom edge up about 2cm, press, and sew straight across.

5. If your using a strip of elastic cut the length of each mitten minus an inch and a half. If using elastic thread, just go ahead and thread your machine.
6. Straight stitch for the first few stitches with the elastic an inch from the bottom. You wanna straight stitch here making sure not to have any gathers at the side edge so that the next step (9 & 10) doesn't turn into a headache. Pull the elastic towards the other end and sew straight across to create a gather on the opposite side.

 7 & 8. It should look something like an octopus without any legs. You could have used a zig-zag stitch on step 6, but I think the straight stitch looks just as good.

 9. So now you'll see why I had you leave the side edge un-gathered (is that a word?). With right sides together, line the sides up so that the elastic meets up (this is why I left my elastic so long, so you could see that they match up on both sides). Also be super sure that the bottom hem matches up as well!
10. Pin and continue to sew all the way around starting from that first stitch (black thread).

 11. Almost finished! Time for the finishing touches. Before turning your kitten mittens right side out, make sure to trim off excess thread and cut down the fabric as close to the thread without cutting it as you can. Take your time! Nothing sucks worse than nearly finishing and having to go back an re-sew. Go ahead and turn it right side out. Take a matching ribbon and make a bow as big or small as you'd like. I cut mine about 7" long to make each of my bows. Grab your hand needle and sew it in place. I recommend sewing through the center knot of the bow at least twice to ensure that the bow never comes undone!
 AND VOILA!


So I wrapped 'em up in some scrap fabric for my sister to pick up and I went a little bananas with the ribbon, can you blame me though? They're so pretty! The pink one has rainbow thread :D<333 Little bundles for the little bundle. (totes came up with that on my own.)


If you end up making some of these please do let me know! I'd love to see them!
Take care <3
XOXOXO


Tuesday, July 30, 2013

My birthday dress tutorial

 Needed: Scissors, measuring tape, 22" zipper, pins, a bed sheet, matching thread, hook and eye, embroidery floss or yarn, and patience


First, I cut away all elastic and opened up the corner seems. I've used the strapless Simplicity 2176 for the bodice and added 1 1/2" straps. You'll see in the last picture that I scrunched it up where the strap meets the bodice.


Next, I folded what was left of the sheet (which was A TON!) in half. I think it was somewhere around 30-45" wide and cut it the length of my skirt. Normally this would be about 20-25" for me but because I wanted a banded bottom without having to sew it on separately I cut the skirt 30" long. I then went ahead and hemmed the skirt before attaching to the bodice just to get it out of the way. I folded the bottom edge (unfinished) up the full 5 extra inches, ironed, pinned, and sewed straight across. It was very easy to keep the hem even because of the fact that the skirt was just one long piece instead of two or three.


I never knew how to do a gathered skirt until recently. It's kinda hard to explain but I'll do my best because it's actually really really simple to do! I set my zig-zag stitch and width to the longest settings, even though my machine clearly disagreed with me. About an inch from the edge of the top of my skirt, I placed embroidery floss in the center of my zig-zag stitch. Idk what this particular foot I used is called but it has a slit in the center and the floss fit snuggly without moving. Just make sure you don't move around and accidentally catch the floss in the actual zig-zag stitch. Otherwise this method will not work! As you can see, it acts as a channel for the floss. Similar to an elastic casing... actually it's more or less the same thing.


  1.  I wrapped one end of the embroidery thread around a pin in the fabric just to secure it while I gather. 
  2. Then I simply pulled the blue string (to the right) while pushing the fabric in the opposite direction (to the left). It's almost impossible to break the string so you can be as aggressive as you'd like. 
  3. I kept going until I got my desired length. My waist is actually 23" but I stopped at 25" to allow for  seam allowance when I added the zipper later on. I placed another pin on the opposite end and wrapped the tail of the thread around it to secure it until after the bodice was attached. 
  4. I matched up the center front of the bodice with the center front of the skirt (right sides together!) and pinned all the way around. I sewed directly on top of the zig-zag stitch. You can sew right underneath it, but I prefer to use it as my guideline. Plus this way I won't need to pull out the blue thread afterwards. 
 Snip off the excess fabric and any extra threads hanging off, put in your zipper, add whatever straps you'd like and voila!! All done!


I hope you enjoy this tutorial! Lemme know if you use it or if you have any questions!

XOXOXO

Wednesday, July 17, 2013

Bow purse tutorial!

How cool, right? So I've been pretty much obsessed with KL from SecretLifeOfABioNerd since her days with ThreadBanger. She's a fashion school grad who has a YouTube channel all about her DIY's, fashion tutorials, skincare, and a bunch more. She's extremely sweet and bubbly- my kinda girl :)

Anyway, a while ago she posted a tutorial for a cute bow purse and I had an old skirt I needed to get rid of so I got to work... It features a couple of handy-dandy pockets on the bow strap, button and zipper closures, and surprisingly has a lot of space inside!

Mine is a little on the flimsy side because I didn't have interfacing at the time, but it's not a big deal. Once I put my things inside it didn't even matter. Did I mention how quick it is to put together? I'm talking less than an hour people! 
I'm not the best at making tutorials so I'll let the master take it away! Be sure to check out her other videos as well! :)


Thursday, May 23, 2013

Pink cat ears ^____^


Say what you want about T-Swift's 22 song/video
I happen to be obsessed with it.

And being the broke girl that I am, I refuse to pay $15-$20 for metal kitten headbands. No matter HOW cute they are. Plus, there's never any colored ones! So naturally I made my own. I found an old Easter headband that had pink petals all across the top so that you'd look like a little flower. (sorry no pictures...) I cut a couple of 'em off and put little clips on the bottom and voila!
And yes, I do actually wear these babies outside :)


Just Because 


Wednesday, May 22, 2013

Random Wedesday!

So if you're participating in the Blog Every Day in May challenge, like so many of us, you'll find it hard to blog literally every day! Just me? Oh okay. 
 I was doing a pretty good job at the start of the month... until my internet went out for almost 2 weeks :( But I'm back with a vengeance! lol Not really, but I'm back into the swing of blogging!!
------------------------------

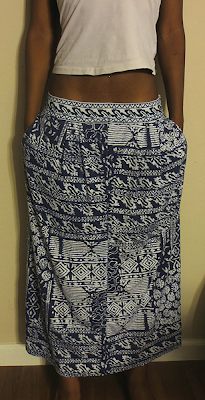
 If you know me you know I HATE wearing pants. Don't ask why... So I took a pair that I found while scourging through the thrift store a while ago and made it into a skirt. The waistband is elastic but it's loose enough that it sits comfortably on my hips but tight enough that they don't fall off! I don't know what to call the print. Nautical? Tribal? Whatever it is I like it, not bad for $3.
------------------------------
I finally got around to sending off my pen pal letters! At first, I couldn't find any stamps. Which was crazy because it seems like there's always a book of stamps lying around my house somewhere! Good grief, whenever I need something it's nowhere to be found. When I don't need it, it's all I see! Oh life, you and your irony. After I went out and bought stamps I caught the post-man as he was coming to drop off mail. I handed them all off to him with a huge smile on my face! Lol I'm sure he thought I was a little loopy but whatever. Who wouldn't be excited to write to their pen pals?! Not you? Well, you don't deserve a pen pal.
------------------------------

(Linking with Shanna )


Tuesday, April 30, 2013

Current DIY project

Anyone who truly knows me would know that I have always been obsessed fashion and lifestyles from way back when. *Think 40's-70's*  And while I mostly favor dresses over any article of clothing I have to say that I've been particularly obsessed with crop-top and skirt/shorts sets.

I made a full tea-length circle skirt some months ago and had a bunch of leftover fabric that I didn't know what to do with. So I made some bows... which of course didn't use up much fabric so I decided rather than waste it I'll just let it sit until I can find something to do with it all. Months went by and the sun came out making it feel just like summer! The idea came and hit me like a ton of bricks- I'll make a matching crop top! At the moment the skirt is just waaay too long for this weather so I'll have to hem it about 5-10 inches. Shouldn't take long, and I won't cut it so that when it gets cold again I can just take the hem out and voila! Perfect tea length circle skirt!


So that's it! There's my little preview. I won't spoil the whole thing, so I'll make it a separate post when everything is finished to show you the whole outfit! I'm so excited to get this project completed!